“`html
Signs Your Trawler AC is Failing Before Total Breakdown
I spent three weeks last summer on the Great Loop with a dying air conditioner, too stubborn to admit the obvious signs until we were anchored near Barkley Lake with zero wind and 94-degree heat index. That’s when everything clicked — and I learned to spot the early warnings that cruisers consistently miss.
The most overlooked symptom is reduced cooling capacity. Not complete failure, just slow degradation that sneaks up on you. Your cabin temperature climbs 2-3 degrees higher than normal even with the system running constantly. By the time you notice it, you’ve already lost 30% cooling efficiency. Then there’s the noise — unusual compressor sounds during startup. A high-pitched squeal or grinding isn’t normal. Normal is a soft hum followed by quiet running.
Refrigerant leaks announce themselves through oily residue around connections, especially near the condenser and compressor. Here’s what I do: grab a white paper towel and wipe the fittings. Greasy brown stains? That’s escaping refrigerant. Breaker trips are another red flag — if your AC breaker pops repeatedly (especially the 30-40 amp dedicated circuit), something’s drawing excess amperage. This often happens before catastrophic failure takes hold.
Salt corrosion on seawater condenser coils is almost guaranteed on coastal cruises. Look at the aluminum fins and you’ll see white oxidation, eventually pitting. Weak airflow from cabin vents means either a clogged air filter or a refrigerant system problem reducing evaporator efficiency — either way, it needs attention.
- Reduced cooling — cabin stays 2-3 degrees warmer despite constant runtime
- Unusual compressor noise — squealing, grinding, or chattering sounds
- Oily residue on fittings — immediate sign of refrigerant escape
- Breaker trips — 30-40 amp AC circuit shutting down repeatedly
- Condenser corrosion — white oxidation and pitting on aluminum fins
- Weak cabin airflow — reduced velocity from vents despite fan running
- Electrical connector corrosion — greenish oxidation on control board terminals
Probably should have opened with this section, honestly. Catching these early saves both money and the misery of sweating through a hot cabin passage.
Diagnostic Flowchart for Trawler AC Problems
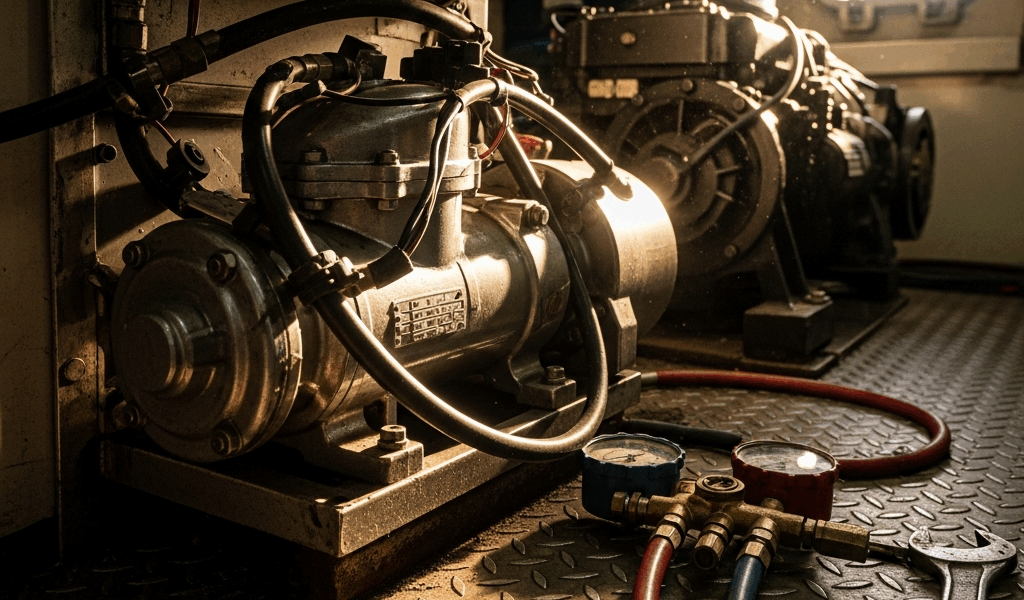
Trawler air conditioning failures demand systematic troubleshooting. You’re often 50 miles from the nearest marina with a technician, so knowing how to work through the problem methodically keeps you from guessing. I’ve developed a hand-tool diagnostic sequence that requires nothing more than a multimeter and basic mechanical sense.
First question: Is the compressor running? Listen for the clutch engaging when you turn the system on. You should hear a soft click followed by compressor operation. Hear nothing? Check that the thermostat is set below cabin temperature. Still no compressor engagement? The problem is electrical — a failed relay, blown fuse, or bad switch. Use a multimeter to check for 12V at the compressor clutch wire. That tells you whether voltage is reaching the component.
Second: Check pressure gauges if accessible. Most trawler systems (Cruiseair, Webasto, Dometic) have low-side and high-side service ports. Normal operating pressures vary by outdoor air temperature, but typical targets are 25-35 psi on the low side and 250-350 psi on the high side at sea level in 80-degree ambient conditions. If low-side pressure is below 20 psi, you have a refrigerant leak or expansion valve problem. High-side pressure over 400 psi suggests condenser blockage or compressor damage — that’s the threshold where you know something’s seriously wrong.
Third: Electrical supply intact? Check the dedicated AC breaker. Is it tripped? Reset it. If it trips again immediately upon running the compressor, you have an electrical fault — burned-out winding, shorted motor, or corroded connection creating a ground fault. A functioning breaker that holds means you’ve cleared this failure mode and can move on to the next diagnostic step.
Fourth: Refrigerant level adequate? Low refrigerant is the single most common failure on cruising boats. Salt air corrodes connections and vibration loosens fittings. Look for oily residue around all fittings again. If you find none but pressure readings are low, the leak is slow and internal — failed seal in the compressor or expansion valve, which is trickier to diagnose.
Fifth: Condenser blocked or fouled? Seawater condensers accumulate salt, biological growth, and sediment. Feel the condenser outlet hose — it should be warm to hot during operation. A cool hose means poor flow. For freshwater-cooled systems, inspect the condenser tubes visually if possible. Salt deposits appear as white crusty buildup that reduces heat transfer efficiency.
Five Common Trawler AC Failures and Field Fixes
Salt-Clogged Seawater Condenser
This kills more trawler AC systems than any other cause. Seawater cooling lines accumulate salt crystal deposits, barnacle larvae, and sediment. The condenser becomes an expensive paperweight taking up engine room space.
Why it happens: Salt doesn’t dissolve evenly. When seawater flows through metal tubes, salt precipitation accelerates near the outlet where pressure drops. Summer cruising through warm Gulf waters? Blockage develops in 4-6 weeks of constant operation.
Field fix: Flush the seawater side with fresh water under pressure — use a hand pump or low-pressure galley faucet through the condenser inlet. Never use a pressure washer or you’ll damage aluminum fins. For severe deposits, create a weak vinegar solution (1 part white vinegar to 4 parts fresh water) and circulate it through the condenser for 15 minutes. A Shurflo 5000 series hand pump ($40-60) works fine for this job. Takes 30 minutes and restores 70-80% efficiency.
Long-term: Install a seawater strainer with 50-micron mesh upstream of the condenser intake. Monthly flushing during peak cruising season prevents major blockage from developing.
Refrigerant Loss
I once traced a slow refrigerant leak to a loose fitting at the high-side port. Vibration from engine running had worked it loose by 0.25 turns. Lost half a pound of R-410A over two weeks without realizing what was happening.
Why it happens: Vibration, corrosion, and thermal cycling loosen connections. Brazing failures develop pinhole leaks. Compressor seal degradation leaks internally and you won’t see external evidence.
Immediate action: Stop running the system if you confirm a leak. Locate the leak using UV dye (already in professional refrigerant at service stations) or soapy water spray around fittings — bubbles reveal escape points immediately. Tighten loose fittings slowly, carefully. If the leak is at a connection, you can apply temporary epoxy putty designed for refrigerant (JB Weld sells a version, roughly $8). This holds maybe 48 hours — long enough to reach a marina in many cases.
Recharge steps: Once you’ve sealed the leak, you need to evacuate remaining refrigerant (requires a manifold gauge set and vacuum pump — $200-300 rental from marine suppliers) and recharge the system. Most trawler systems hold 2-4 pounds of R-410A. A proper recharge costs $150-300 at a marina but maintains system integrity for years.
Compressor Thermal Overload
The compressor overheats and its built-in thermal switch trips, shutting down the system. It restarts after cooling, then cycles off again every 10-15 minutes. You’re stuck in this frustrating pattern.
Why it happens: Condenser blockage (poor heat rejection), low refrigerant, or an internal compressor problem generates excessive heat. The system is working too hard.
Load reduction strategy: Close cabin doors to reduce cooling demand. Run the AC in lower cool settings to reduce compressor runtime. Increase shade — deploy sunshade curtains or awnings to block solar heat gain. If ambient air temperature exceeds 95 degrees, reduce interior cooling target from 72 to 76 degrees. This allows the compressor to cycle normally instead of running constantly.
Corroded Electrical Connections
Salt air oxidizes copper and aluminum connections, creating high-resistance points. The compressor clutch receives insufficient voltage, won’t engage properly, or draws excess current. You turn it on and nothing happens, or it cycles erratically.
Why it happens: Trawlers operate in salt-air environments. Connections exposed to cabin humidity and salt spray oxidize faster than shore-side equipment. Diesel engines vibrate constantly, shaking connections loose over time.
Field fix: Disconnect power at the breaker first. Locate corroded terminals — they’re greenish or white on copper, gray on aluminum. Clean with a wire brush or fine sandpaper. Reconnect and apply a thin coat of dielectric grease to prevent re-corrosion. Cost: $3 for a tube of grease, 10 minutes of work. This often restores 30-50% of a failing system’s performance temporarily.
Failed Capacitor
The capacitor stores electrical charge to start the compressor motor. When it fails, the compressor hums but doesn’t turn over. You hear a buzzing sound but no mechanical operation — it’s stuck.
Why it happens: Capacitors age. High ambient temperatures accelerate failure. Most capacitors are rated for 85-degree ambient; a cabin reaching 95 degrees in summer creates stress they weren’t designed for.
Replacement: Capacitors are $40-80 parts. Discharge the old capacitor using an insulated screwdriver across its terminals (isolate power first). Note the terminal positions, unscrew the faulty capacitor, and install the replacement matching specs — microfarads and voltage rating are printed on the case. This 15-minute job revives systems frequently.
When to Limp Along vs. When to Find a Tech
Not all AC failures demand professional repair before your next passage. Some absolutely require it immediately.
Safe to continue cruising: Reduced cooling efficiency, minor refrigerant leaks sealed with epoxy, capacitor replacement, electrical connector cleaning, and condenser flushing. These don’t risk engine or generator damage. You’ll be uncomfortable but safe.
Find a technician before running again: Compressor bearing noise (grinding, not humming), oil contamination visible in the compressor sight glass, or seawater entering the refrigerant lines. These cause catastrophic failure and potential engine damage if the compressor seizes.
The Great Loop has reliable AC-capable technicians at major marinas — Defoe Shipbuilding in Saginaw, MI; Campsites of the North at the Minnesota entry point; and most ports in Tennessee and Louisiana. Rural areas like the Black Warrior Waterway or Little Mahantango in Pennsylvania have zero nearby service. Plan accordingly and fix what you can before heading into those areas.
Maintenance Schedule to Prevent AC Failure on Long Passages
Pre-passage preparation takes 90 minutes and costs under $75 in supplies. Worth every minute.
Six weeks before departure: Inspect all refrigerant line fittings for leaks using soapy water. Tighten loose fittings 0.125 turn. Check compressor oil level (visible through sight glass) and note color — should be clear or light amber. If dark or cloudy, refrigerant contamination is likely and you need professional assessment.
Four weeks before: Flush the seawater condenser with fresh water. Install or replace the seawater strainer element ($20-30). For freshwater systems, inspect the heat exchanger and note any deposits that might be forming.
Two weeks before: Run the AC system for 30 continuous minutes and monitor pressure gauges at high ambient temperatures (wait for a warm afternoon if you can). Record low-side and high-side readings. Compare against previous records — any upward creep in high-side pressure indicates early condenser fouling.
One week before departure: Replace the filter drier if the system uses one and it’s been two seasons since replacement. Filter driers absorb moisture and contaminants — they cost $30-50 and prevent expensive repairs downstream. Clean all electrical connections with a wire brush.
During passages: Monthly condenser flush if running continuously. Weekly breaker inspection to ensure it’s holding firm. Listen for unusual compressor noise during startup.
Professional service versus DIY? Complete system evacuation, recharge, and seal replacement runs $400-600 at a qualified marine technician shop. Most cruisers handle filters, condensers, connections, and capacitors themselves. Refrigerant work requires EPA certification — don’t attempt it without proper equipment and training.
Spending two hours and $70 before a summer cruise prevents spending $2,000 and two weeks sitting in a hot cabin in rural Louisiana. Experience taught me that lesson the hard way.
“`


Stay in the loop
Get the latest passage maker mag updates delivered to your inbox.