Where Is the Bleed Screw on a Diesel Engine? How to Bleed Your Marine Diesel
Marine diesel troubleshooting has gotten messy with all the conflicting advice flying around online. As someone who’s spent close to fifteen years working on boats — everything from 28-foot sailboats with Yanmar 2GM20s to 50-foot trawlers running twin Cummins QSB6.7s — I picked up the practical knowledge of bleeding a fuel system the hard way. Usually at anchor. Usually in the rain. If you’re here because an engine won’t catch and you’ve already burned twenty minutes on the starter, you’re in the right place. Air in the fuel system is almost always the reason a marine diesel refuses to start, and once you know what you’re looking for, the fix is genuinely straightforward.
Why You Need to Bleed Your Marine Diesel
Diesel engines are unforgiving about fuel delivery. No spark plug to force ignition — just compression and a precise spray of fuel at exactly the right millisecond. Air in the lines breaks that. The injectors can’t atomize what isn’t there.
Air gets in through a few specific doors. Running the tank dry is the most common culprit — especially on sailboats pushing fuel consumption close to the limit on a long offshore passage. Filter changes are the second biggest cause. Crack open a filter housing and you’re introducing air, full stop. Same goes for any line work: replacing a lift pump, reseating a fitting, or tightening a connection that was leaking and letting air in while it was loose.
The symptoms aren’t subtle. Engine cranks but won’t fire. Or it starts, runs ten seconds, dies. Sometimes it fires unevenly, surges, cuts out under load. That rough behavior is partially air-locked injectors trying to work with an interrupted fuel supply.
Quick callout up front — but some modern common-rail diesels have self-priming electric fuel pumps that purge air automatically. Certain Volvo IPS systems. Newer Cummins QSB units. Check your manual before you touch anything. I’ve watched people disassemble a filter housing on a boat with an auto-priming system that would have sorted itself out in thirty seconds of cranking. Side-step the error I made.
Bleed Screw Locations by Engine Brand
This is the practical part. Bleed screw location varies by manufacturer — sometimes by model within the same brand. Here’s where to look on the marine diesels you’re most likely to encounter.
Yanmar
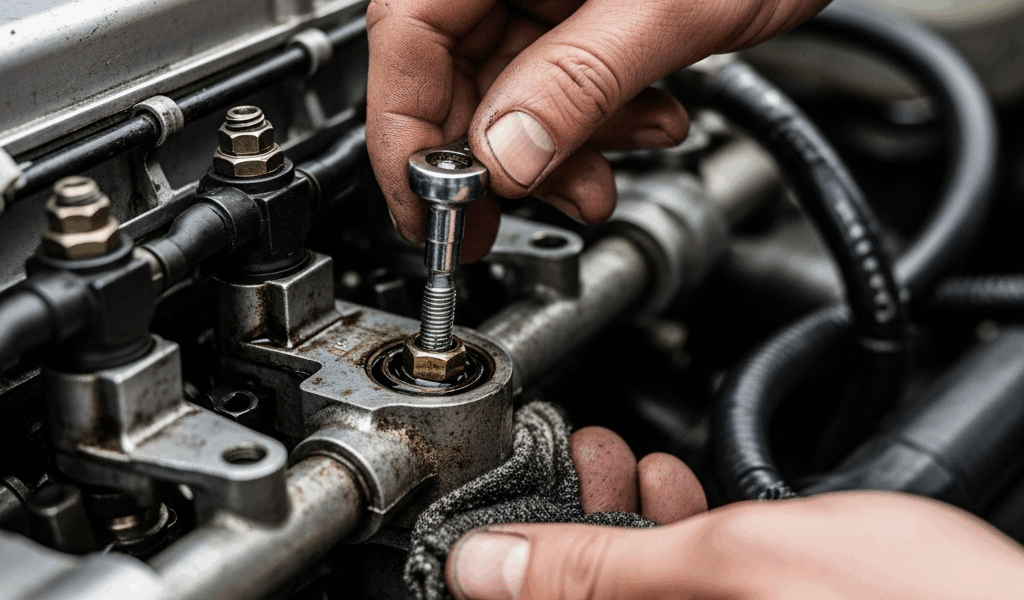
Yanmar is probably the most common small marine diesel on the water, and their bleed screw layout is fairly consistent across the range. On the 1GM10, 2GM20, 3GM30, and 3JH series, there are typically two bleed points — one on the primary fuel filter bracket (or the Racor housing if you’ve swapped in an aftermarket filter) and one on the secondary filter bolted directly to the engine block. The secondary filter bleed screw on a 3GM30 is a small brass screw, usually 8mm, sitting on top of the filter housing. Some models also have a banjo bolt at the injection pump inlet that functions as a third bleed point — useful when the secondary filter alone doesn’t clear the air.
Perkins
The Perkins 4.108 and M92B powered thousands of production sailboats through the 1980s and 90s. Both have bleed screws on the fuel filter housing and on the injection pump body itself. The injection pump bleed screw on a 4.108 is on the top forward face of the pump — and it’s a slotted screw, not a hex head, which catches people off guard every single time. There’s also a manual priming lever on the lift pump, mounted on the starboard side of the block. You’ll use that during the bleeding process.
Cummins
On older mechanically-injected Cummins engines — the 4BT and 6BT — there’s a bleed screw on the primary filter housing and sometimes a Schrader valve at the injection pump rail. Newer common-rail units like the QSB5.9 and QSB6.7 are largely self-bleeding. High-pressure fuel pump builds system pressure during cranking. If a QSB won’t start after sitting dry, the standard approach is to crank it in ten-second bursts with thirty seconds between attempts — lets the lift pump charge the system. Opening bleed screws on a common-rail system isn’t something to attempt without training.
Volvo Penta
Volvo Penta’s MD series — MD2, MD7, MD11, MD17 — all have manual bleed screws on the filter housing and injection pump. The MD2B, one of the most widely used small marine diesels ever built, has its bleed screw on top of the spin-on secondary filter bracket, just forward of the heat exchanger. That’s what makes the MD2B endearing to us sailors — simple, logical layout, nothing hidden. The newer D-series engines (D1, D2, D3) shifted to an electric lift pump that handles most of the priming automatically.
Beta Marine
Beta Marine engines are built on Kubota industrial blocks — which matters because the bleed point layout follows Kubota’s design logic, not a marine-specific one. On a Beta 25 or Beta 43, there’s typically one bleed screw on the secondary filter housing. Beta also fits an electric fuel lift pump on most of their marine conversions, so the process is simpler: loosen the screw, run the electric pump, wait for clean fuel, tighten. Honestly one of the more user-friendly systems out there.
How to Bleed a Marine Diesel — Step by Step
The process is consistent across most mechanical injection systems. While you won’t need a full tool kit, you will need a handful of specific items: a rag, a small container to catch fuel, a wrench sized for your bleed screws (usually 8mm or 10mm — sometimes a flathead), and eye protection. Diesel in the eyes is not a minor inconvenience.
- Check your fuel level first. If the tank is actually empty, bleeding won’t help. Fill it before you do anything else. Seems obvious. I’ve skipped this step and wasted forty minutes troubleshooting a perfectly functional fuel system.
- Locate all bleed points. Start at the primary filter — usually a Racor or equivalent water separator — then the secondary filter on the engine, then the injection pump if needed. Know the full route before you start opening things.
- Loosen the first bleed screw — don’t remove it. Half a turn to a full turn is enough. You want fuel to weep past the threads, not spray across the engine bay.
- Operate the manual lift pump lever or switch on the electric fuel pump. Manual lift pump — common on Perkins and older Yanmars — use a slow, steady stroke on the priming lever on the side of the pump body. Electric pump, just switch it on at the panel.
- Watch the fuel at the bleed screw. It’ll be bubbly or frothy at first — that’s the air leaving. Keep pumping. When the flow becomes a steady, bubble-free stream, that section is clear.
- Tighten the bleed screw before moving forward. Work through the system in order — filter, then pump, then injectors if necessary. Skipping ahead pulls air back in.
- Attempt to start the engine. After bleeding the filter and pump, most engines will fire. If it cranks but won’t catch, you may need to crack the injector lines — loosen the high-pressure line fittings at the injector body half a turn, crank briefly, retighten when fuel weeps out. One injector at a time.
Frustrated by a Yanmar 3GM30 that wouldn’t start after a routine filter change, I once bled the secondary filter perfectly — clean fuel, no bubbles — and skipped the injection pump screw because I assumed I’d cleared everything. Engine started, ran thirty seconds, died. Another thirty minutes of troubleshooting eventually led me back to that pump bleed screw I’d decided didn’t matter. Don’t skip steps to save time. It doesn’t work.
When Bleeding Doesn’t Fix It
You’ve bled the system correctly. Twice. Engine still won’t run right. That points somewhere else entirely.
Lift Pump Failure
The mechanical lift pump on older engines uses a rubber diaphragm — and that diaphragm deteriorates with age and fuel exposure. A failed one can’t build enough pressure to push fuel to the injection pump, so air pockets keep reforming no matter how many times you bleed. Test it by disconnecting the outlet line and cranking the engine. Strong, pulsing flow means it’s working. A weak trickle or nothing means replacement. A Perkins 4.108 lift pump runs roughly $45 to $70 from a marine supplier; Yanmar replacements are around $60 to $90.
Injector Problems
Worn or clogged injectors won’t atomize fuel properly even with a perfectly bled system. Black or white exhaust smoke, rough idle that persists after warm-up, uneven running under load — those are the signs. A pop tester is required for proper diagnosis, which puts this beyond most DIY situations. Send them to a diesel injector shop. Budget around $80 to $150 per injector for testing and reconditioning.
Fuel Tank Contamination
Water or microbial growth — the black sludge people call “diesel bug” — will clog filters faster than you can change them. If you’re burning through filters every few hours, or the filter bowl is filling with black stringy material, the tank needs professional cleaning or treatment with a biocide like Grotamar 82. Contaminated fuel causes air-lock symptoms by starving the injection pump through a constantly clogged filter — so it looks like a bleeding problem when it’s actually a tank problem.
Bleeding a marine diesel is a low-barrier mechanical skill with a high return. Find your bleed screws before you need them — ideally tied up at the dock, not drifting toward a lee shore at dusk.


Stay in the loop
Get the latest passage maker mag updates delivered to your inbox.