“`html
Why Trawler Galley Lines Freeze Differently Than House Systems
Galley water line freezing has gotten complicated with all the conflicting advice flying around — especially during Great Loop winter cruising. As someone who’s spent four winters running the Loop between November and March, I learned everything there is to know about why copper lines fail in ways that leave you standing in a dark galley at 2 AM wondering what went wrong when the thermometer outside reads 42°F.
Here’s what the standard winterization guides conveniently skip over: your galley water lines aren’t tucked in an attic or basement where they belong. They’re routed through the bilge. Constantly vibrating. Exposed to wind chill that makes the ambient temperature almost meaningless.
Most trawlers—especially those older displacement hulls built in the 1980s and 1990s—have galley plumbing running through open bilge spaces on the way from tank to sink. The lines sit maybe eight inches below the cabin sole in an area that gets zero passive heating. When you’re transiting between marinas in November, your boat’s interior might be 55°F while running, and the actual water in the lines sits even colder. Add a 35-knot wind chill, and you’re creating freeze conditions at temperatures your engine gauge says are totally safe.
That pink foam wrap from the hardware store? Fails spectacularly on passage-makers. The constant diesel engine thrumming cracks the foam. Bilge moisture softens the adhesive. Over 2,000 nautical miles of Great Loop cruising, vibration separates that cheap insulation from the copper — leaving the critical inches around fittings completely exposed. I watched this happen to my own 1987 Albin 28 during my first winter transit through the Dismal Swamp, where the water temperature dropped to 38°F and stayed there for six days straight.
Older boat builders also prioritized installation ease over thermal protection. Many trawlers route water lines along the hull side in exposed lazarettes or engine room spaces open to outside through through-hull fittings. That temperature differential between 42°F ambient and the metal hull itself? It creates condensation that freezes right on top of whatever insulation you’ve wrapped.
Signs Your Galley Plumbing Is at Risk Before Freeze Damage
Catch problems during your daily cruising checks. I started keeping a water system log after my first freeze incident — honestly, it caught three problems before they turned into disasters.
First sign: water pressure drops gradually as you run the engine. Not suddenly — gradually. Ice crystals are forming inside the lines, narrowing the diameter. You’ll notice it when rinsing dishes and the pressure shifts from normal to a thin trickle over five or ten minutes. Shut down the engine to let it cool, and the pressure returns partially because the water warms up slightly. This pattern repeats every time you run.
Second sign: your sink strainer accumulates tiny ice crystals even though the galley is heated. Look inside the strainer basket when you shut down in the afternoon. White crystalline buildup that wasn’t there this morning means ice is forming in the line ahead of the strainer — that’s your 48-hour warning.
Third sign: copper lines running under the galley counter bead with condensation while the cabin air feels dry. This seems harmless until that condensation freezes solid. When the line gets cold enough, water vapor condenses directly onto the metal, and once temperatures drop below 32°F, it becomes ice. I’ve seen quarter-inch ice sheaths form on otherwise insulated lines during overnight passages through northern portions of the Tennessee-Tombigbee in late November.
Fourth sign — and this one is easy to miss — water tastes metallic or gritty. Sediment and corrosion happen as the system partially freezes and thaws. The water quality shift happens before actual line failure, giving you a 72-hour window to fix it.
Heat Trace Cable Installation for Underway Protection
Probably should have opened with this section, honestly. Heat trace cable is the single most effective passage-maker intervention I’ve found. It doesn’t replace insulation — it complements it. And it works while you’re running or anchored.
Two types exist: self-regulating (which adjusts output based on temperature) and manual thermostat (which you control). For Great Loop passage-making, self-regulating wins because you’re transiting constantly and can’t babysit a thermostat.
The Chromalox SRL or Backer EasyHeat HWML cables run between $3.50 and $6 per linear foot. A typical galley system needs 40-50 feet — so you’re spending $140 to $300 on cable alone. Installation adds $400-$800 if you hire a marine electrician. DIY during summer haul-out costs labor time only.
Here’s the critical detail passage-makers miss: power draw. Self-regulating heat trace uses 8-12 watts per foot when active — meaning 50 feet can pull 400-600 watts continuously on a cold night. If your boat runs a 10-kilowatt diesel generator for other systems, this adds roughly 8-10% load. That’s livable. If you’re running a small 5kW portable genset or relying on batteries, this becomes a serious consideration.
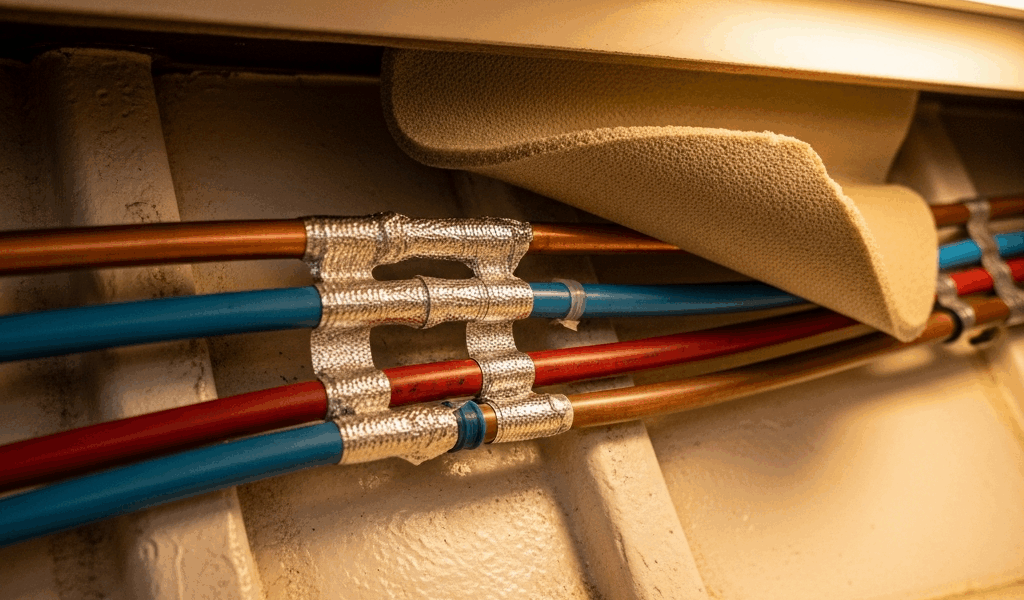
Installation sequence: drain the lines completely, wrap heat trace directly around the water line starting at the tank outlet, run it under the insulation (never over it), and secure it with fiberglass reinforced tape every 12 inches. The tape prevents vibration damage that separates heat trace from the copper. Route your power cable through conduit in the bilge and surface it through the cabin sole into a dedicated breaker. This takes a weekend.
The thermostat option costs $200-$400 more but lets you set activation at 38°F instead of running continuously. Manual thermostat heat trace uses 18-22 watts per foot when active — so you save generator load if you’re disciplined about monitoring. Most passage-makers find the complexity not worth the savings.
Why hardware store heat tape fails: insufficient power output (residential versions use 1-2 watts per foot), inadequate waterproofing under bilge conditions, and connectors that corrode in salty bilge environments. Marine-grade cable costs more because the insulation, connections, and power density are engineered for salt spray, humidity, and vibration — the actual reality of boat bilges.
Insulation and Wrapping Strategy That Actually Stays Put
Standard pink foam pipe insulation has a shelf life of about 500 nautical miles on an active cruising boat before vibration separates it from the pipe. I’ve peeled off foam that was clinging to copper at random angles after a two-week Great Loop transit.
Better option: closed-cell spray foam applied during summer haul-out. A marine contractor can spray-foam your galley lines in place for $600-$1,200 depending on your boat’s configuration. The foam sets to a density that resists both vibration cracking and moisture penetration — surviving multi-year winter seasons if you maintain the outer moisture barrier.
For DIY work, adhesive-backed foam pipe wrap (the kind used for HVAC work) holds better than standard wraps. Wrap the heat trace first, then apply adhesive-backed foam over it in overlapping layers. Cost runs $80-$120 for a full galley system, and it stays put through winter transits if you use fiberglass reinforced tape to lock the seams.
Fiberglass sleeves rated for marine use (not the cheap hardware store versions) slide over lines and provide mechanical protection. These cost $2-$3 per foot and work best combined with closed-cell spray foam underneath. The sleeve protects the insulation from UV, abrasion, and rodent damage in the bilge. Many passage-makers overlook this — then find mice have chewed channels through the foam by spring.
Maintenance between seasons: inspect every September and replace any sections where the foam has separated from the pipe. Check for mold growth inside the insulation (this happens in humid bilge environments of winter-stored boats). Replace the outer moisture barrier tape if you see any bilge water staining or corrosion on the copper beneath.
Emergency Thaw Procedures When Freeze Happens Underway
You’re underway. Water system just quit. Temperatures dropped to 28°F overnight. Here’s what actually works.
Heat gun is your first tool — set it to low (not high) and apply heat gradually to the frozen section, moving the gun in circles to avoid localized overheating. Start at the tank end and work toward the galley. This takes 20-30 minutes for a typical galley system. Keep the gun at least six inches from the copper to prevent weakening.
While you’re heating, circulate hot water from your cabin heating system (if you have one) through the lines. Run the engine, turn the galley heater to maximum if you have a cabin hot water loop, and let that warm water start moving. Many passage-makers don’t realize their diesel heating systems can circulate hot water through the galley supply lines if they’re plumbed for it — your owner’s manual has the schematic.
Hair dryer, believe it or not, works effectively for smaller sections around fittings where the heat gun can’t reach. Twenty minutes of hair dryer heat on high will thaw ice around a frozen three-way valve. Slower but more controllable.
What not to do: never use a torch. The flame heats the copper faster than the water inside can warm, which ruptures the line from internal steam pressure. Don’t pour boiling water over frozen lines — the thermal shock cracks fittings. Don’t force frozen valves open; you’ll snap the handle and flood the bilge. Don’t try heating the cabin above 75°F hoping the lines warm up passively; this takes 48 hours you don’t have.
If you’re stuck with a frozen through-hull fitting (worst-case scenario), you have two options: call for tow-in assistance to the nearest marina for haul-out, or wait out the freeze at an anchorage with the engine running continuously (burning 2-3 gallons per hour) while you apply heat. Most passage-makers find the tow option less expensive than the fuel cost of an extended warm-engine hold.
Preventive Winterization Checklist for Great Loop Cruisers
This routine happens in October, before you start the winter run. First time takes a full day — then two hours annually after that.
First: run your water system with the heat trace cable active for four hours (if you have one installed). This verifies the system is working and confirms power draw at your generator. Note the breaker amperage so you know if adding another circuit will overload your electrical panel.
Second: drain the tank completely, flush the lines with fresh water, and drain again. This removes sediment that accelerates corrosion during freeze-thaw cycles. While the tank is empty, inspect the interior for rust or contamination. Two hours of work prevents taste and quality issues down the line.
Third: add biocide to your fresh water tank if you’ll be in the boat intermittently (not continuously cruising). Tank additive options include RV-specific versions like Aqua Kem Blue (non-toxic, $15-$25 per treatment) or marine-specific products like Microban M-100 ($40-$60). These prevent bacterial growth during weeks when you’re not running the system. Skip this if you’re running the boat daily; fresh water circulation prevents growth.
Fourth: exercise all through-hull valves monthly. Open and close each one deliberately every 30 days of the cruising season. Frozen valves often fail because they’ve been stuck shut for weeks. Monthly cycling ensures they move freely.
Fifth: create a marina layover protocol. When you stop for more than three days, drain low-point through-hull valves (the seacocks that empty the lowest bilge sections). Close the main tank valve. Run the galley heater system for 30 minutes even if you’re not using hot water — just to keep the lines circulating.
Spring recommissioning in late March: flush the system with bleach solution (one teaspoon per five gallons), circulate for 30 minutes, then run fresh water through until you smell no bleach. Refill, test pressure, and inspect copper lines for corrosion that developed over winter. Replace any foam insulation that separated, and update your heat trace battery connections if they corroded.
Tie this back to your Great Loop schedule. The November push south is your winterization window. January through February layover months are your maintenance period. The March push north is when you finish spring commissioning at the last marina before open water. Following this timeline keeps your galley operational through the entire passage season.
“`


Stay in the loop
Get the latest passage maker mag updates delivered to your inbox.