“`html
The Three Failure Points Every Trawler Owner Misses
Engine room flooding doesn’t announce itself with dramatic fanfare—I’ve spent the last six years living aboard and cruising trawlers from the Great Lakes to the Bahamas, and I can tell you with certainty. It starts as a slow drip behind the generator, then a trickle in the bilge that you tell yourself you’ll address next season. By the time most crews realize they have a real problem, they’re already calculating how fast the water is rising and whether they can reach shallow bottom before the batteries die.
Here’s what gets complicated: understanding where water actually gets in. Most boat owners know the obvious stuff—through-hulls, seacocks, hose connections. But the three failure points that sink cruising boats happen in places people forget to look.
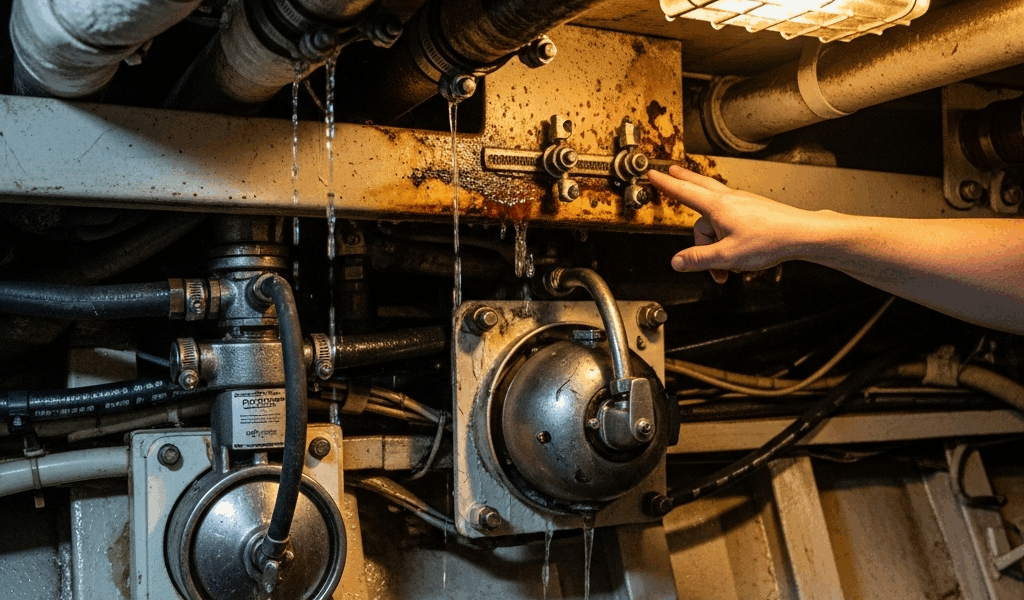
First: raw-water seals under sustained engine load. On Nordhavn and Kadey-Krogen hulls especially, the water cooling system pulls from through-hulls located below the static waterline. The impeller pump and seal assembly can run trouble-free for 1,500 hours in local cruising, then fail catastrophically once you’re six hours offshore with sustained RPM. That seal wasn’t designed for a multi-week passage at 2,000 RPM continuous — when it leaks, it doesn’t drip. Five to eight gallons an hour straight into the bilge.
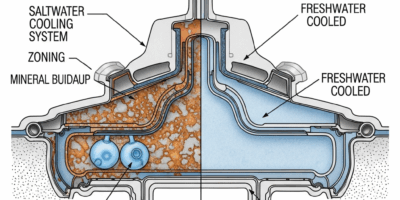
Second: through-hull corrosion in brackish water. The Great Loop transition from freshwater to brackish destroys through-hull fittings that worked fine in salt. Bronze and Marelon fittings corrode differently in pH-neutral to slightly acidic water mixed with tannins and agricultural runoff. A through-hull that passed haul-out inspection in the Keys will weep in the Tennessee River because the corrosion happens from the inside out. You can’t see it until it fails.
Third—and this one I learned the hard way—neglected bilge pump maintenance. Probably should have opened with this section, honestly. Most trawlers leave the dock with one electric bilge pump they’ve never actually tested, mounted in a sump tank whose intake strainer hasn’t been cleaned since the previous owner’s era. When real water starts flowing, that pump either runs continuously for hours, draining the house batteries dead, or fails completely because the strainer is clogged with the exact debris it was designed to catch.
Pre-Passage Engine Room Inspection Checklist
Do this 24 hours before departure. Spend 45 minutes. That’s what makes engine room failures preventable — they announce themselves if you actually look.
Bilge Pump System
- Fill the sump tank with fresh water to normal operating level — usually 8–12 inches above the pump intake
- Switch the bilge pump to manual mode and listen for the motor to start within 3 seconds
- Once running, water level should drop visibly within 10 seconds. You’re looking for 500–800 gallons per hour minimum on a 40–50 ft trawler
- If water level doesn’t drop: the strainer is blocked or pump is failing. Clean the strainer basket — it’s usually accessible from inside the bilge compartment — or test the pump outlet to confirm water is actually moving
- Test the automatic float switch by tilting the bilge sump manually. The pump should activate at roughly 4–6 inches of water depth
- Check the bilge pump discharge outlet. Follow the hose from the pump all the way to where it exits the hull. Make sure the one-way valve isn’t stuck and the outlet isn’t clogged with old barnacles or corrosion
Through-Hull Fittings and Seacocks
- Locate every through-hull fitting in the engine room and aft cabin: raw-water intake, engine cooling discharge, head discharge, galley discharge, cockpit scupper drain
- Open and close each seacock valve twice. It should move smoothly and turn off completely. If a valve is stuck or turns slowly, it’s corroded and needs replacement before you leave the dock
- Inspect the fitting itself with a flashlight for white crusty corrosion buildup around the base where the fitting enters the hull. This is bronze disease or dezincification on brass fittings — it means the fitting is compromised even if it currently holds water
- Run your fingers along the outside of each hose connected to through-hulls. Feel for soft spots, cracks, or white spray-like corrosion on the hose clamps. Replace any questionable hose sections immediately
Raw-Water Cooling System
- Check the intake strainer bowl — the transparent plastic housing on the raw-water intake line. It should be completely clean and clear of sediment, leaves, or debris. If it’s dirty, clean it now and don’t run the engine until it’s clear
- Feel the hose between the intake strainer and the impeller pump. It should be firm, not soft or squishy. Squeeze the hose gently — if your finger can push through it easily, the hose is failing internally and needs replacement
- Inspect the impeller pump body and shaft seal for weeping. A few drops per hour is normal. Steady dripping or a wet bilge under that pump means the seal is failing
Zinc Anodes and Sacrificial Protection
- Check the zinc anode attached to the raw-water cooling system intake — a small cylindrical zinc block. If it’s more than 50% consumed, replace it now. A depleted zinc means the fitting itself is being corroded
- Visually inspect through-hull fittings for white or chalky buildup. This means the zinc is working. If the fitting looks shiny and clean with no white buildup, the anode might be missing or disconnected
Hose Clamps and Connections
- Walk the engine room with a socket wrench set. Tighten every hose clamp by one-quarter turn. Don’t over-tighten — you’ll crush the hose — but most clamps loosen over time and a loose clamp is a future leak
- Pay special attention to raw-water intake hoses and engine discharge hoses. These see the most pressure and temperature cycling
Sump Tank Level and Drainage
- The engine room bilge sump should be empty or contain only a thin layer of water — 1–2 inches. If the sump is half-full, you have a slow leak somewhere that you need to identify before departure
- Open the sump drain plug and confirm water actually flows out. If the drain is clogged, clear it
Emergency Response When Water Enters the Engine Room
You’ve been underway for 12 hours. Your co-skipper is below in the engine room and radios topside: “Water’s coming in. Not fast, but it’s coming in.”
Your immediate actions, in order: Stop the engine. Shut off the raw-water seacock. Activate the electric bilge pump to manual mode — full continuous run. Now assess.
Rate the water ingress. Is it rising in the bilge faster than the pump can handle? Look at the bilge level in your sump tank. If water is rising faster than 2–3 inches per hour, you have a serious breach and need to make decisions about beaching or turning back immediately. If it’s slower than that, you have time to work the problem.
Find the source. Is water coming from a through-hull fitting, a hose connection, or the engine cooling seal? A weeping through-hull will show water trickling around the fitting base. A burst hose shows water spraying. A seal failure shows water coming from inside the pump assembly. Identifying the source takes 5–10 minutes and determines your repair options.
For a through-hull leak: close the seacock and confirm water stops. If it does, the fitting itself is compromised but you can limp to port under controlled conditions with the seacock closed — this means no engine cooling, so you’re limited to very low RPM or sailing. If water continues trickling even with the seacock closed, the valve is stuck open. You need a wooden tapered plug hammered in from inside the hull as a temporary repair.
For a hose connection leak: tighten the clamp first. A half-turn on a clamp that’s worked loose might be enough. If tightening doesn’t stop it, you need a hose patch kit — a rubber sleeve with stainless hose clamps cinched over the puncture. Alternatively, cut out the damaged section of hose and use a rubber splice connector if the hose is long enough to allow it.
For a seal failure: this one’s harder. You can’t repair an internal seal at sea. Your options are to reduce engine load — lower RPM — monitor the bilge pump closely, and accept that you’re running the bilge pump continuously to port. If the leak rate exceeds your pump capacity, you need to turn back or beach in shallow water.
Bilge Pump Redundancy That Actually Works on Passage
A single electric bilge pump on a cruising trawler is a single point of failure. I learned this through a failed float switch in the Florida Strait, not a textbook.
The redundancy that actually works consists of three components: a primary automatic electric pump, a secondary manual pump, and a backup electric pump on a separate circuit.
Primary automatic pump — typically 1,500–2,000 GPH for 40–50 ft trawlers. Mounted in the main sump tank with a float switch. Powered from the house battery bank with a 30-amp breaker. This runs automatically when water level rises.
Secondary manual pump — a small deck-mounted or cabin-accessible manual bilge pump, hand or foot activated. These pump 5–15 gallons per stroke and require physical effort, but they work without batteries or wiring. On real passage-making boats, the manual pump is how crews keep the bilge controlled if the electric system fails or the batteries are depleted.
Backup electric pump — a second automatic pump in a separate compartment, like the galley sump or head sump, on its own circuit, powered from a dedicated battery. This runs if the main sump overwhelms the primary pump. Sizing for 40–60 ft trawlers means 1,200–1,500 GPH minimum on the primary, 800–1,000 GPH on the backup.
The key difference between boats that stay afloat and boats that sink is that crews on passage-making trawlers test this system monthly in normal conditions, not once during the survey.
Through-Hull Maintenance for Great Loop and Coastal Cruising
Through-hull fittings corrode at different rates depending on water chemistry and material. Freshwater and brackish water are actually worse for bronze fittings than salt water because salt provides a protective crust while freshwater leaches zinc from brass alloys.
Selene and Grand Banks hulls typically use a mix of bronze seacocks and Marelon plastic through-hull fittings. Marelon doesn’t corrode but can crack under impact or vibration. Bronze seacocks corrode from the inside out in brackish water — which means visual inspection doesn’t catch the failure until water is already entering.
Inspection intervals: Check through-hulls every 50 engine hours or monthly, whichever comes first. Look for corrosion buildup, soft spots in hoses, loose clamps, and weeping around the fitting base. Replacement priority goes to any fitting showing white crusty buildup (bronze disease) or any seacock that doesn’t move smoothly. Replace, don’t repair.
Testing integrity without haul-out: Close the seacock, then monitor the sump tank for the next 24 hours. If water level rises even slightly, water is seeping through the closed seacock and the fitting needs replacement. Modern marinas often offer underwater photography services — inspect through-hulls without hauling, costs $200–400 per boat, tells you exactly what you’re dealing with before you commit $800–1,200 per fitting replacement.
Material choice matters for passage-making. Marelon fittings for non-critical applications — cockpit scuppers, head discharge. Bronze seacocks with stainless steel balls for raw-water and engine cooling intake, backed by dedicated zinc anodes. This costs more upfront but eliminates the guessing game about whether a fitting will fail 200 miles offshore.
“`


Stay in the loop
Get the latest passage maker mag updates delivered to your inbox.